
Nothing Beats That Crispy Layer of Rice.
Whenever I make a tahdig, dinner becomes a special event. This spectacular dish always feels like a celebration. Indeed, I’m sure it will be making an appearance on the tables of many people who will be enjoying the Persian New Year today. I make sure that whatever else I’m serving is either being kept warm in the oven or is being cooked on the grill by another family member, so that I can give my full attention to the tahdig. It’s not that it’s difficult. It isn’t. But it does require your attention.
I’ve been making Samin Nosrat’s basic recipe for quite awhile, but over time I’ve tweaked it to suit my own taste. The one part of her technique that I think is critical, is when you’ve added all your rice to the skillet, you want to rotate your pan 90° every 4 minutes. This ensures an evenly cooked bottom. Every stove or pan will have a hot spot or spots. By rotating the pan, you get the tahdig’s crispy bottom rice layer to cook evenly. This is why I say that cooking a tahdig requires paying attention. I don’t recommend putting it on the stove and walking away. I set my timer for 4 minute increments. That way I won’t get distracted and forget to rotate my skillet.
I recommend you use a 10 inch non-stick skillet. While a cast iron skillet would most likely produce a nice crispy rice layer, I wouldn’t want to have to deal with the weigh of cast iron when flipping the tahdig out of the pan onto a serving platter. A less weighty non-stick skillet is my go-to.
After the rice is partially cooked, I mix 2 cups of it with saffron, which I’ve soaked in a little hot water, and a little plain yogurt. The yogurt practically guarantees a perfectly crisped layer of rice.

I then mix chopped fresh mint into the remaining the rice. After heating butter and oil in my skillet over medium heat, I toss in some coriander seeds before spreading the rice/yogurt mixture into the pan. After adding half of the reserved rice to the skillet, I sprinkle dried barberries * over it before slightly mounding the remaining rice over the barberry layer.
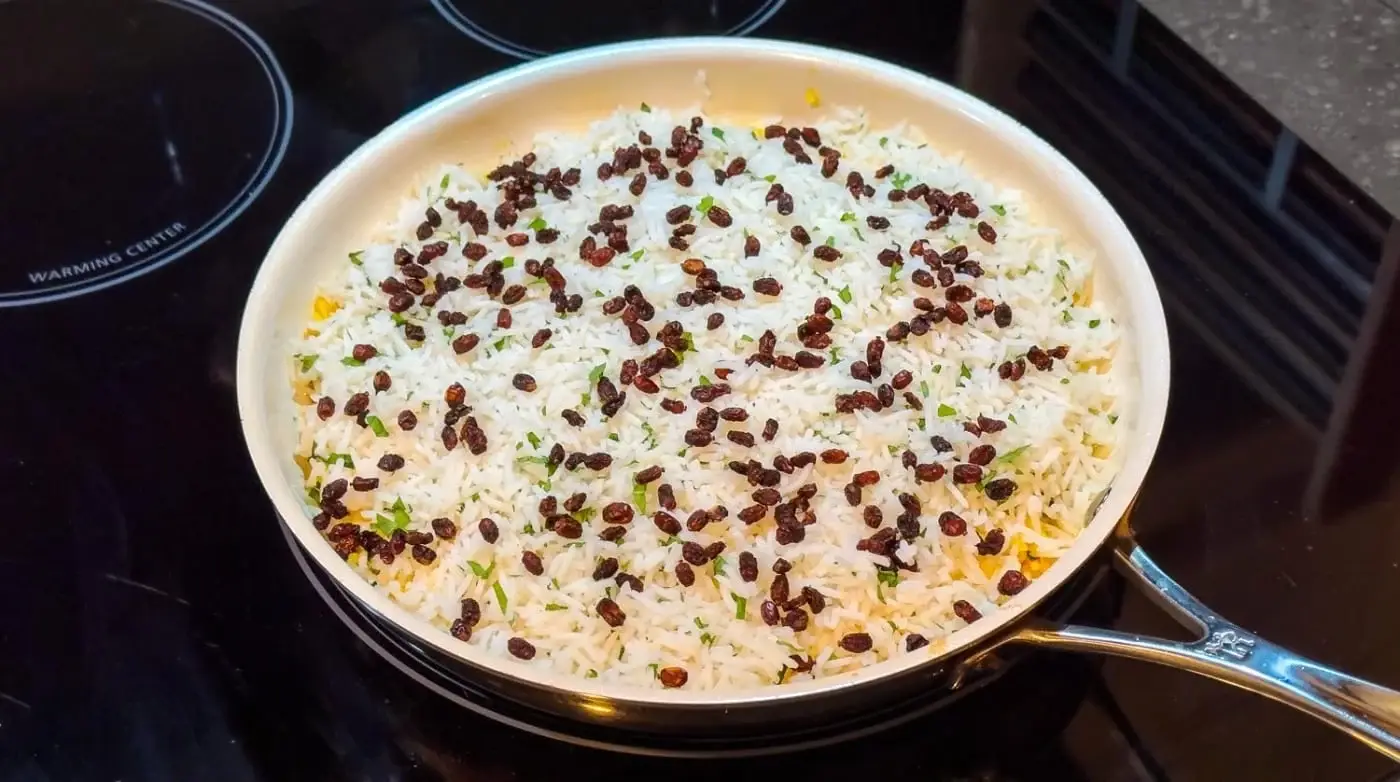
Using the handle end of a wooden spoon or similar utensil, I poke 6 holes in the rice, going all the way to the bottom of the pan. This allows steam to escape and keeps the rice from getting soggy.
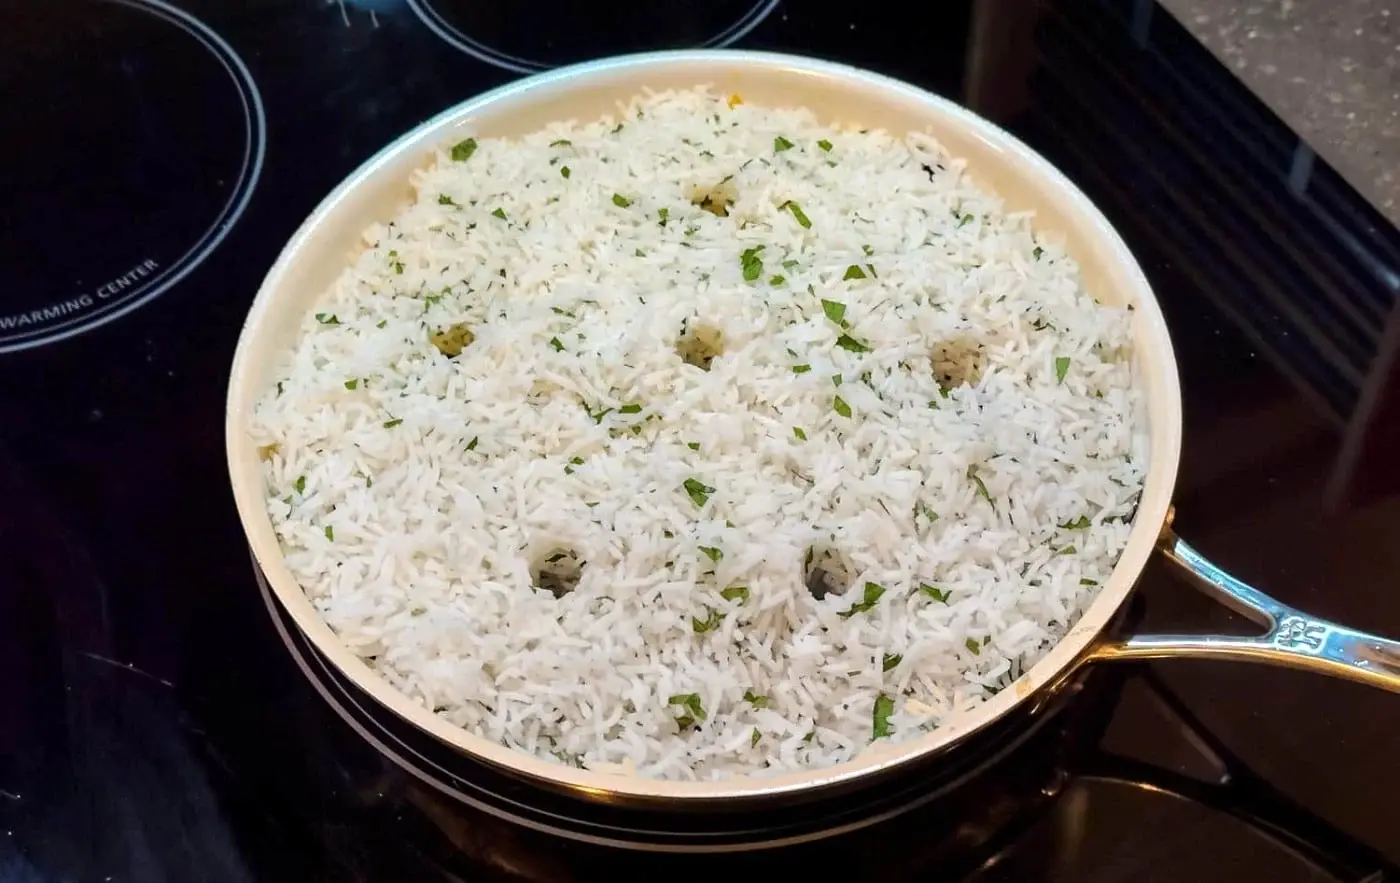
Then it’s just a matter of rotating your pan every 4 minutes, and maintaining the heat at approximately a medium level. After 24 minutes,if you use a little offset spatula to loosen the edge and peek down the sides, you should be able to see some golden color developing on the edges. At that point, I lower the heat to medium low and continue cooking and rotating the pan for an additional 16 minutes. During the last 5 minutes or so, I scattered defrosted frozen green peas on top and seasoned them with a little salt.

Knowing your own stove and the amount of heat it produces is what will aid in having a great end result. As many times as I’ve cooked a tahdig, I’ve never had one stick in the pan, nor have I had it come out too pale. I did have one turn out almost black on the bottom, so I learned to dial back the heat level. But here’s the funny thing about that. Even the one that was way too dark still tasted delicious. It didn’t taste burnt. I have no idea why that was so, but it speaks to how special a tahdig is and to the joy of eating it.
Now comes the anxiety producing step. Check to see if there is any oil left in the pan that has not been absorbed by the rice. You do this by tipping the pan a little and seeing if any oil is pooling on the edge. If so, use a paper towel to absorb it. You can’t simply tip it and drain the oil out of the pan. The tahdig would fall out of the pan. I don’t usually have much excess oil.
Then you place a serving plate or platter over the top of the skillet, and using heat proof mitts or gloves, flip over the pan. The tahdig should fall right out of the skillet onto the plate. And as Samin says, if by chance, some of it should stick, simply scrape it out and do as Persian women have always done, and joyfully declare that this is the way you intended to serve it.
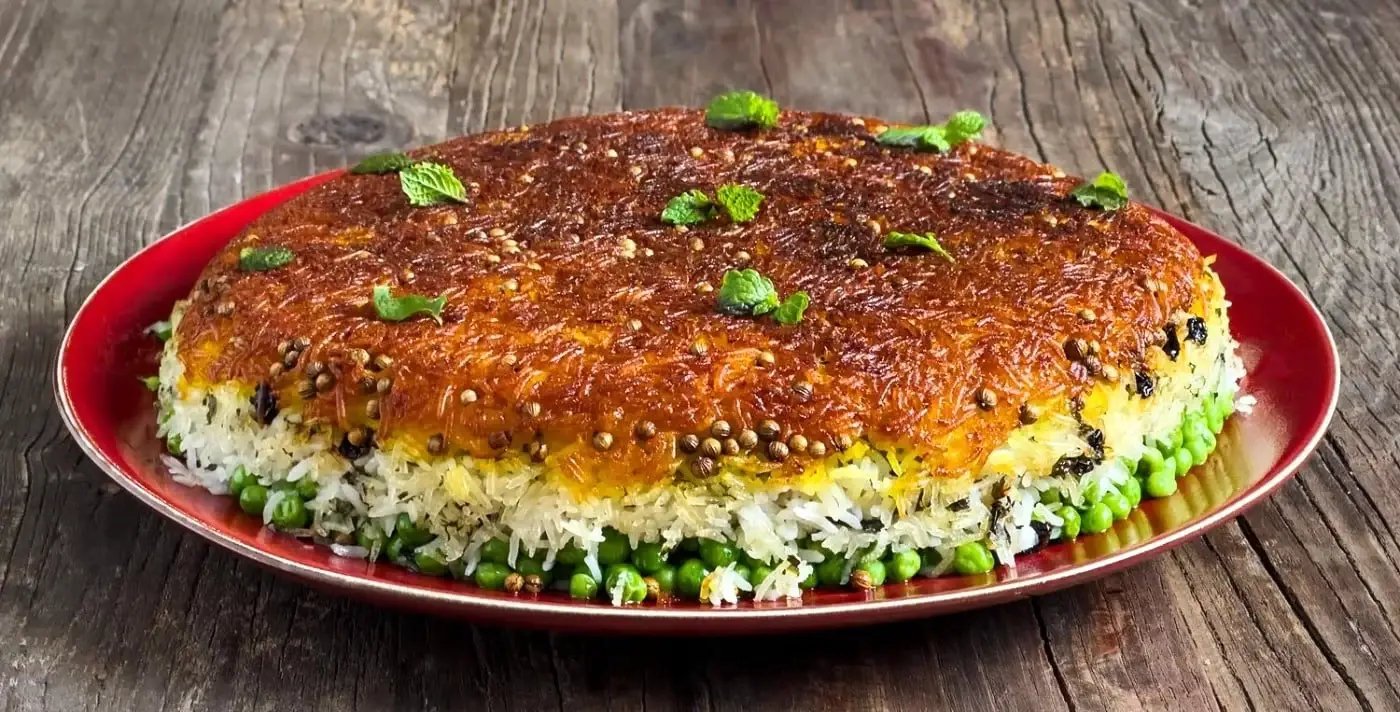
I added the layer of barberries *, the coriander seeds, the mint, and the peas because I was making this the centerpiece of my meal. I didn’t want plain rice. I wanted the rice to be full of flavor and for it to have some textural interest. Had I wanted it to play a supporting role, I would have kept it more simple. I thought about the peas at the last minute and wasn’t sure how they were going to turn out, but it ends up that 5 minutes of steaming on top of the rice is the perfect amount of time for the peas to cook. The mint leant a floral aromatic quality, while the barberries * added a touch of sweet/tartness. Then the earthiness of the peas really capped it off well. I was concerned about the coriander seeds possibly scorching in the butter and oil, but they didn’t, and ended up being a very welcome addition in both flavor and crunchy texture.
In the end, it really does all come down to that crispy layer of rice. I can’t think of anything I enjoy eating more than this. It’s the perfect food. Buttery and infused with saffron, the flavor is incredible. But that texture is sublime. There’s no other word for it. Cracking into that crust with a spoon and releasing the steaming aromas from the saffron and mint is one of life’s great pleasures. Next to eating it, of course. That’s when the real magic happens.

Tahdig with Barberries, Peas, and Mint
A crispy crust of saffron rice encases layers of barberries and peas. Fresh mint is added to some of the rice and coriander seeds are cooked in butter and oil. It doesn't get any better than this, my friends.
4-6
servingsKeep the screen of your device on
Ingredients
2 cups basmati rice
1/3 cup Morton’s kosher salt, plus more for seasoning the peas
1/2 cup packed fresh mint leaves, chopped, plus a few mint leaves for garnish
1/2 teaspoon saffron threads, crumbled
1 tablespoon boiling water
1/4 cup whole-milk plain yogurt
2 teaspoons coriander seeds
3 tablespoons salted butter
4 tablespoons neutral vegetable oil
1/4 heaping cup dried barberries *
2 cups frozen baby peas, thawed
Directions
- Rinse the rice in cold running water until the water runs as clear as possible. Soak the rice in cold water for 30 - 45 minutes. Add 1/3 cup salt to a large pot of boiling water. Drain the rice and add to the pot. Cook for 6 minutes, until al dente. Drain and rinse with cold water to stop it from cooking.
- Add 1 tablespoon boiling water to a small bowl. Stir in the saffron and let steep while the rice is cooking. Stir in the yogurt and 2 cups of the cooled and drained rice. Mix well.
- In a 10 inch skillet over medium heat, add the butter and vegetable oil. When it stops bubbling add the coriander seeds, scattering them evenly over the bottom of the pan. Carefully spoon in the rice/yogurt mixture. Toss the remaining rice with the chopped mint and add half to the pan, distributing it evenly over the yogurt/rice layer. Scatter on the barberries and then add the remaining rice, creating a slight mound in the center of the pan. Use the handle end of a wooden spoon or similar tool to poke 6 holes in the rice. Poke the holes all the way through the rice to the bottom of the pan. This allows steam to escape and keeps the rice from turning out soggy.
- Set your timer for 4 minutes and let the rice cook undisturbed. When the timer goes off, give the skillet a 90° spin and continue to cook in the same manner, setting the timer for 4 minutes and spinning the pan 90° until it has cooked for 24 minutes. Lower the heat to medium low or low, depending on your stove and continue with the same cooking method (spinning 90° every 4 minutes) for another 16 minutes. During the last 5 minutes of cooking, spread the peas on top of the rice and sprinkle with a pinch of salt. Remove the pan from the heat.
- Gently tip the pan in order to see if there is any oil that hasn't been absorbed by the rice. If this is the case, use a paper towel to absorb the oil. Place a large plate or serving platter on top of the skillet, making sure the plate is larger than the skillet. Using heat proof gloves or mitts, grasp the pan and quickly flip it over. The tahdig should release and fall onto the plate. Remove the skillet, scatter on the mint leaves and present this beauty. Use a large spoon to break into the crust of rice and serve. Enjoy!
Equipment
- 10 Inch Non-Stick Skillet